


Flexo Sleeve Inspection Checklist for Detecting Damage Before Mounting
A flexo sleeve should not be treated as a passive consumable that only needs attention after a visible print defect. Before mounting, it is a rotating press component that must remain dimensionally stable, structurally sound, clean, and correctly matched to the mandrel, plate system, and job requirements. A small defect can become a registration issue, bounce, plate lift, vibration source, or—in the case of a damaged composite sleeve—a more serious failure risk at press speed.
No single universal standard prescribes every inspection point for every flexographic sleeve design. The controlling requirements are normally the sleeve manufacturer’s instructions, the press manufacturer’s mounting and operating requirements, the plant’s documented inspection procedure, and applicable machinery-safety obligations. ISO 12647-6 provides process-control guidance for flexographic printing, but it does not replace sleeve-specific acceptance criteria. The practical objective is clear: do not mount a sleeve when its condition cannot support safe rotation and predictable print performance.
Start with identification and service status
Inspection begins before the sleeve is handled. Confirm that the sleeve is the intended item for the job and that its identification remains legible. A sleeve with a correct physical condition but incorrect repeat length, diameter, taper, thickness build-up, or plate-mounting specification can create the same operational consequences as a damaged sleeve.
- Verify sleeve ID, repeat or circumference, face width, and construction type against the job record.
- Confirm compatibility with the designated air mandrel or adapter system. A sleeve designed for one mandrel configuration should not be forced onto another because the nominal dimensions appear similar.
- Review the previous-use record where one exists: print defects, impact events, difficult demounting, cleaning chemicals used, repairs, and any prior conditional release.
- Check whether the sleeve is within any supplier-defined service-life, inspection, or recertification interval.
- Confirm that the correct handling equipment is available. A sleeve may be fit for use but unsuitable for manual movement if its size, weight, or storage position creates an avoidable handling hazard.
Traceability matters most when repeated faults occur. If sleeves are stored without a history of repairs, impacts, or recurring print problems, the inspection team may identify surface symptoms without recognizing that the same sleeve has already shown a developing structural issue.
Control handling before examining the sleeve
A sound inspection can be undermined by unsafe handling. Sleeves can be light relative to solid cylinders, but their large diameter, length, and fragile edges create different risks. They may roll from a bench, be crushed by improper supports, or be damaged when lifted from one end. Carbon-fibre or glass-fibre composite structures also require care because impact damage is not always obvious from the outer surface.
Use clean, stable supports that carry the sleeve evenly and prevent rolling. Do not rest a sleeve directly on hard floor surfaces, sharp rack edges, or narrow metal bars that create local point loads. Avoid dragging it across worktops. When compressed air is used for mounting or removal, follow the press and sleeve supplier’s specified pressure limits and keep hands, clothing, and loose materials away from the sleeve-to-mandrel interface.
Compressed air is a mounting aid, not a method for overcoming a poor fit. A sleeve that does not expand, slide, or seat as expected should be stopped and investigated. Increasing pressure beyond the approved limit can damage the sleeve, seals, mandrel, or associated pneumatic components and may release the sleeve unpredictably.
Examine the external surface under suitable light
Visual inspection should be carried out under clean, directional lighting rather than relying on a quick glance in the press area. Rotate the sleeve slowly on its support and inspect the full circumference, both ends, and the working face. The purpose is not merely to find obvious cracks; it is to identify defects that can alter the sleeve’s geometry, surface energy, balance, or ability to hold mounting tape and plates consistently.
Look for the following conditions:
- Cracks and splits: Pay particular attention to sleeve ends, areas around previous impact marks, and transitions between materials. A hairline crack at an edge can propagate when the sleeve expands during mounting or runs under cyclic load.
- Dents, flat spots, and local depressions: These can produce uneven impression, plate-edge lifting, bounce, or a repeatable print defect. A dent that cannot be felt easily may still be visible when light reflects across the surface at a shallow angle.
- Gouges, cuts, and abrasions: Surface damage can reduce tape adhesion or create a local height variation. Deep cuts should not be obscured with tape or temporary filler unless a documented repair method specifically permits it.
- Delamination, blistering, or raised areas: These are particularly significant on composite sleeves. A change in surface profile, a hollow sound during a carefully controlled tap check where such testing is approved, or a soft area may indicate separation within the structure.
- Contamination: Ink residue, adhesive, silicone, oil, grease, dust, tape fragments, and cleaning-agent deposits can affect tape bonding and plate mounting. Contamination near the ends may also interfere with seating and removal.
- Discoloration or chemical attack: Staining, whitening, softening, swelling, embrittlement, or an unusual surface texture may indicate exposure to incompatible solvents, wash chemicals, or UV-related degradation.
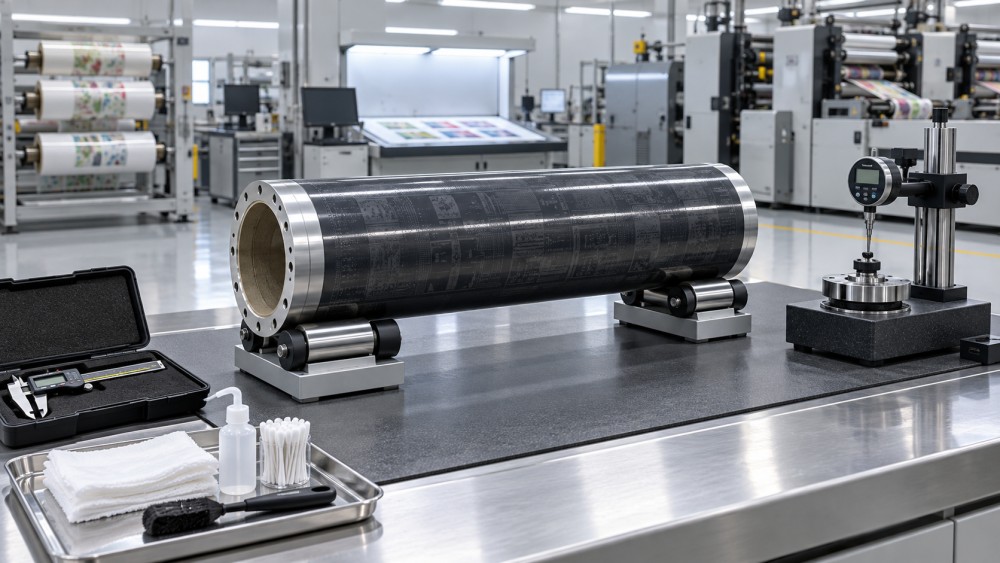
Inspection should distinguish between a cosmetic mark and a functional defect. A superficial stain outside the plate-mounting zone may be acceptable if it does not affect handling, mounting, or structural integrity. A small mark at a sleeve edge, by contrast, may be unacceptable if it is associated with cracking or could interfere with air-assisted mounting. Acceptance should be based on the defect’s location, depth, stability, and relation to the sleeve’s operating stresses—not on appearance alone.
Inspect the bore and ends as carefully as the print face
The inside diameter and sleeve ends are often neglected because they are less visible once the sleeve is in use. Yet damage in these areas can create the most immediate mounting and safety concerns. The bore must permit controlled expansion and even seating on the mandrel. Any obstruction, distortion, or internal contamination can change how the sleeve behaves under air pressure.
Check the bore for adhesive residues, dust accumulation, hardened ink, loose fragments, scratches, cracking, and signs of moisture exposure. Inspect both ends for chipping, crushed edges, ovality, fraying, or deformation. Do not use sharp tools to remove internal debris; this can score the bore and create a stress concentration. Use only cleaning methods and materials approved for the sleeve construction.
Where the sleeve includes end rings, protective edge components, conductive features, or identification bands, inspect their attachment and condition. Loose or damaged end components may affect handling, mounting, balance, or the reliability of sleeve identification.
Confirm dimensional integrity rather than assuming it
A sleeve can look undamaged and still be unsuitable for production if its geometry has changed. Dimensional checks need not be unnecessarily elaborate for every job, but the level of verification should reflect the consequences of error. New sleeves, sleeves after repair, sleeves involved in an impact, and sleeves linked to repeatable registration or impression faults deserve more formal measurement.
Key checks may include face width, nominal circumference or repeat, diameter at specified locations, and runout where the available equipment and procedure support measurement. Measurements should be made using calibrated tools and against the supplier’s stated tolerances or the plant’s approved limits. A measured result has little value if the reference condition is unknown.
Ovality and runout are not interchangeable. Ovality refers to variation in the sleeve’s circular shape; runout is the observed radial variation as the mounted assembly rotates relative to a reference. Either condition can contribute to cyclic print variation. A sleeve may also mount with apparent normality but exhibit a repeatable defect only at operating speed, making pre-mount dimensional verification valuable after suspected mishandling.
Do not attempt to correct dimensional faults by altering tape thickness locally, increasing impression, or changing press settings to mask the symptom. Such adjustments can shift the defect to another unit, accelerate plate wear, or introduce a misleading “acceptable” condition that fails during a later job.
Assess the mounting surface and plate interface
For plate sleeves and bridge sleeves, the working surface must support consistent tape adhesion across the full plate area. For sleeves carrying plates already mounted, the inspection extends to the plate, tape, seams, and edge condition. The sleeve may be structurally acceptable while the mounted assembly is not fit to enter the press.
- Ensure the surface is dry, clean, and free from incompatible cleaning residues.
- Check for tape lifting, trapped debris, wrinkles, overlaps, damaged seams, and uneven tape build-up.
- Inspect plate edges for lifting, cuts, compression damage, and distortion.
- Confirm that the selected mounting tape matches the required thickness, adhesive system, and application conditions.
- Check that plate positioning marks, registration references, and job orientation are clear and consistent with the approved layout.
Adhesive performance is highly dependent on surface preparation. A sleeve wiped with an unapproved solvent may look clean but retain a film that weakens tape adhesion. Conversely, aggressive cleaning can attack certain sleeve surfaces. The correct standard is not “visibly clean”; it is clean, dry, and prepared according to the material and tape supplier’s instructions.
Separate release decisions from production pressure
The most important part of a flexo sleeve inspection is the release decision. When the press is waiting, there is pressure to treat a doubtful condition as minor. That is precisely when clear categories prevent inconsistent judgment. A useful system distinguishes between sleeves that are fit for use, sleeves that require cleaning or minor approved corrective action before release, and sleeves that must be quarantined for technical assessment.
Immediate quarantine is appropriate when there is cracking, suspected delamination, bore damage, significant deformation, loose structural components, uncertain compatibility, damage after a drop or collision, or a condition that prevents controlled mounting. The sleeve should be clearly identified to prevent accidental reuse. A sleeve removed from service should not return simply because the visible area has been cleaned or because it appears to mount under increased air pressure.
For uncertain defects, inspection records should capture the sleeve ID, date, defect location, description, photographs where useful, measurement results, cleaning agents involved, and release decision. This creates a defensible quality record and helps distinguish isolated damage from recurring problems caused by storage, chemical exposure, handling methods, or press set-up practices.
Mounting is a final verification point, not the first inspection
Even a sleeve released after bench inspection should be observed during mounting. Confirm that it expands evenly, moves onto the mandrel without excessive resistance, reaches its designated position, and remains stable after air is reduced in accordance with the equipment procedure. Check that the locking, locating, and guard arrangements are correctly engaged before rotation.
The first low-speed rotation and make-ready impressions provide a final opportunity to detect abnormal runout, vibration, noise, plate lift, or repeating print variation. These observations do not replace pre-mount inspection; they confirm that the sleeve, mandrel, plate assembly, and press interface are functioning together. If abnormal behavior appears, stop the process and investigate the assembly rather than compensating immediately with impression or registration adjustments.
A disciplined flexo sleeve inspection routine reduces avoidable defects because it addresses the conditions that are easiest to correct before the sleeve reaches production speed. It also creates a clearer boundary between normal preparation and unacceptable risk. Cleanliness, geometry, structural integrity, bore condition, and controlled mounting are not separate housekeeping tasks. They are connected controls that protect print consistency, equipment reliability, and safe press operation.
Related News
 How an Impression Roller for Flexo Printing Affects Print QualityDiscover how an impression roller for flexo printing influences ink transfer, dot gain, alignment, and print consistency. Learn practical setup and troubleshooting tips.Print Fluidics Scientist
 Why Color Measurement Systems Matter for Consistent Flexo PrintingColor Measurement Systems help flexo printers achieve consistent brand colors, reduce waste, improve traceability, and protect packaging quality across every production run.Print Fluidics Scientist
 What to Check Before Choosing a Print Dryers Supplier for Your PressPrint dryers supplier selection guide: compare drying methods, press integration, energy use, maintenance, safety, and support to improve print quality and uptime.Print Fluidics Scientist
 How to Compare Web Tension Controller Manufacturers for Flexo PressesWeb tension controller manufacturer comparison guide for flexo presses: assess stability, sensing, integration, service, and real-world substrate performance.Print Fluidics Scientist
 How Hot Air Print Dryers Improve Ink Drying on Flexo LinesHot air print dryers improve flexo ink drying with balanced airflow, controlled heat, and reliable results for faster packaging production.Print Fluidics Scientist
 How to Choose a Plate Cylinder Manufacturer for Reliable Print QualityChoose a reliable plate cylinder manufacturer with proven precision, balance control, material expertise, and press compatibility for consistent print quality.Print Fluidics Scientist