


When Should Carbide Die Cutting Knives Be Replaced?
Knowing when to replace carbide die cutting knives is essential for maintenance teams responsible for consistent cut quality and machine uptime. Although carbide edges can deliver long service life, wear, chipping, or damage may lead to rough edges, incomplete cuts, increased waste, and unplanned stoppages. This guide explains the practical warning signs to check, the operating conditions that affect knife life, and how to decide whether sharpening or replacement is the better maintenance option.
The short answer: replace a knife when it can no longer produce an acceptable cut within the machine’s approved operating settings, or when damage or dimensional limits make continued use unsafe or unsuitable. A gradual decline in cut quality calls for diagnosis; a crack, loose carbide insert, or significant edge fracture calls for removal from service.
Start with the cut, not the calendar
A fixed replacement interval can help with planning, but it is a poor substitute for inspection. Knife life depends on the material, cutting geometry, machine setup, and whether the edge contacts a counter surface. A knife cutting clean paperboard may behave differently after a change to abrasive recycled stock, coated material, or board with a different thickness and flute profile.
Compare current production with an approved sample from the same job and material. Check both the visible edge and the way blanks separate during stripping or downstream handling. A cut that looks acceptable on a stationary sheet may still cause problems at production speed.
- Fibrous or fuzzy edges: The blade may be pushing or tearing fibers rather than cutting them cleanly.
- Incomplete cuts: Unseparated areas, hanging fibers, or blanks that require extra force to strip can indicate wear or uneven contact.
- Crushed or distorted material: A dull edge can increase compression around the cut, although excessive pressure and an unsuitable setup can cause similar damage.
- Localized nicks or repeated marks: Defects appearing at the same point on successive blanks can point to a damaged section of the cutting edge or its mating surface.
- More frequent adjustments: If acceptable quality requires repeated pressure changes within approved limits, investigate before the next run rather than treating adjustment as a permanent fix.
An isolated defect does not prove that the knife has reached the end of its life. Record where it occurs, which side of the sheet is affected, and whether it follows a particular position in the die or a repeating position around a rotary tool. That pattern helps distinguish an edge problem from sheet movement, a damaged counter surface, or another setup issue.
Inspect the edge before increasing pressure
Increasing cutting pressure may temporarily separate a troublesome blank, but it can also hide the cause and place additional load on the die, counter surface, bearings, or machine structure. Never exceed the equipment or tooling supplier’s limits to compensate for a worn edge.
Stop and isolate the machine according to the site’s lockout procedure before accessing the tooling. Use appropriate cut-resistant protection and the handling method specified for the knife assembly. Once the knife is safe to inspect, remove debris using a method approved for the tool; adhesive, coating deposits, and compacted paper dust can make a serviceable edge appear blunt.
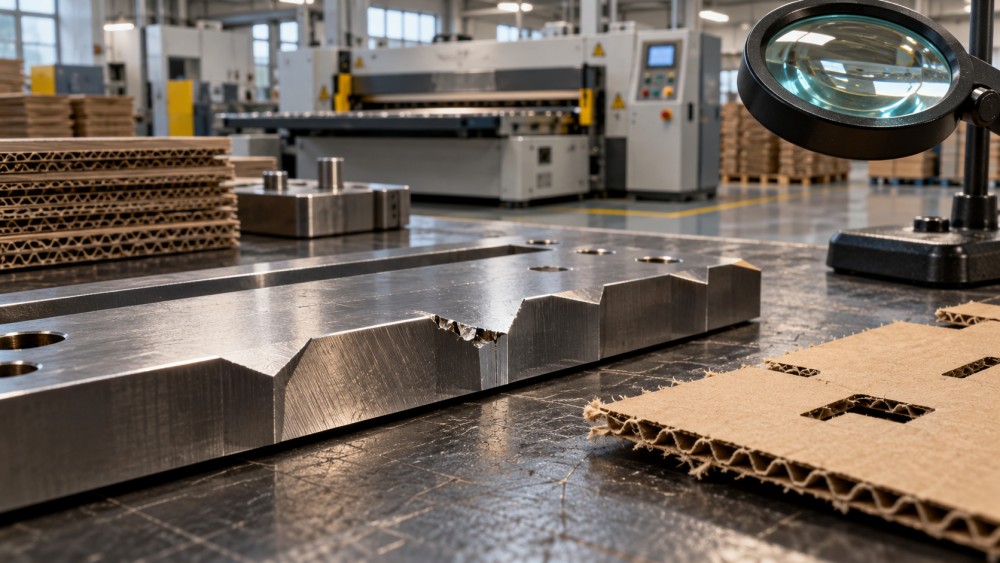
Use suitable lighting and magnification to examine the edge along its working length. Look for rounding, chips, cracks, missing carbide, unusual discoloration, and damage around mounting points. On a brazed or mechanically retained carbide component, also check for movement or separation at the joint. Do not test sharpness with a finger or attempt an improvised repair.
Remove the knife from service if there is a crack, a loose segment, or a chip that compromises the cutting edge. Have a qualified tooling specialist assess whether the assembly can be repaired; do not assume that a fractured carbide edge can be safely restored by ordinary sharpening. A damaged knife should not return to production simply because it still cuts part of the sheet.
Rule out the rest of the cutting system
A new knife will not correct every incomplete cut. Before authorizing replacement, check the components and settings that determine how the edge meets the material. The relevant checks differ between flatbed and rotary systems, so use the machine and die supplier’s instructions rather than transferring settings from another press.
On a flatbed die-cutter, inspect the cutting plate or counter surface for local wear, grooves, contamination, and condition. Review make-ready, die seating, and pressure distribution. A low or damaged area in the counter surface can produce an incomplete cut at the same location even with a sound edge. Uneven packing or an incorrectly seated die can produce a similar symptom.
On a rotary system, inspect the anvil or mating surface, tool mounting, alignment, and any settings that control contact or clearance. Where an anvil cover is used, its condition and profile matter. Also check for play or vibration in the assembly through the approved maintenance procedure. Avoid adjusting contact by eye when the supplier specifies a measurement method.
Material changes deserve attention too. Moisture, board caliper variation, coatings, and contamination can alter cutting behavior. If defects began immediately after a stock change, compare the new material and setup with the previous run before concluding that the knife suddenly wore out. Conversely, if the same defect persists across approved stocks and follows the tool after a controlled change, the evidence against the knife becomes stronger.
Sharpen, repair, or replace?
Not every carbide cutting component is designed to be resharpened. Some are disposable inserts; others may be reground if their geometry and remaining dimensions allow it. Confirm the tooling design and supplier’s service limits before sending a knife for grinding.
Sharpening is worth considering when wear is relatively uniform, the edge and mounting area are structurally sound, and enough material remains to restore the specified profile. The service provider should be able to maintain the required bevel, height, straightness or profile, and surface condition. Grinding carbide requires suitable equipment and process control; an incorrect grind can shorten service life or change how the tool contacts its mating surface.
Replacement is usually the better decision when the knife has reached its minimum permitted dimension, has damage beyond the supplier’s repair criteria, or cannot be restored without altering a critical profile. Replace it as well when a reconditioned edge repeatedly fails to hold acceptable quality and the cause has been traced to the tool rather than the machine or stock.
For a brazed assembly, a specialist may need to assess the carbide, joint, and steel body together. Repairability depends on the construction and the extent of damage. Do not substitute a locally ground profile or a different carbide grade without checking compatibility with the tool designer: hardness, toughness, edge geometry, and mounting all affect performance.
The cost comparison should include more than the sharpening invoice. Consider removal and installation time, freight and turnaround, inspection, expected remaining life, and the risk of missing a scheduled production window. For a critical line, keeping an approved spare may be more useful than running a borderline knife until the next failure.
What shortens carbide knife life?
Carbide can resist abrasion well, but its edge can chip under impact or poor support. Wear and sudden damage therefore require different responses. A progressively rounded edge may be a normal service-life issue; a fresh chip after a jam suggests an event that needs investigation before another knife is installed.
Common contributors include abrasive fillers or contaminants in the substrate, hardened adhesive deposits, foreign objects, incorrect alignment, excessive contact with the counter surface, and unstable mounting. Jams and improper handling during changeovers can damage an edge before it has accumulated much production time.
If several knives fail in the same location, examine the mating surface and mounting conditions before ordering more replacements. A repeatable chip pattern may indicate a local contact problem. If failures occur after transport or storage instead, review protective packaging and handling. Carbide edges should be protected from contact with other tools, even when the assembly looks robust.
Set an inspection interval using plant evidence
Begin with the equipment or tooling supplier’s inspection guidance and the plant’s maintenance procedures. Then build a history for each knife or tooling assembly. A useful record connects the edge condition to the job, rather than logging only the date of replacement.
Record the tool identification, installation date, material grade and construction, production count or running time, approved settings, observed defects, and any sharpening or repair. Keep samples or photographs of recurring cut defects where practical. Note jams, foreign-object incidents, and changes to the counter surface; those events can explain a sudden loss of edge quality that a production count cannot.
Use the history to schedule inspection before the point at which quality typically becomes unstable for a comparable application. Where jobs vary substantially, separate records by material or die rather than applying one interval to the entire plant. Vision inspection and production data can help identify a rising defect trend, but a camera result still needs to be connected to physical inspection and the approved product specification.
This system-level view is particularly relevant in corrugated and paper packaging, where a small cutting defect can turn into stripping interruptions, folder-gluer problems, or rejected finished cartons. CPCS covers these converting processes alongside maintenance and production management, helping teams look beyond the price of a consumable to its effect on the whole line.
Before installing the replacement
Verify the part number and tool revision against the machine and die documentation. Confirm dimensions, cutting profile, mounting arrangement, orientation, and compatibility with the mating surface. For reconditioned tooling, request a record of the work performed and check the remaining dimensions against the supplier’s limits.
Inspect and clean the mounting surfaces, then install and secure the assembly using the specified procedure and torque values where applicable. Check the counter surface and remove the cause of any previous chip or premature wear. After guards are restored and the machine is released under site procedures, run an approved setup and inspect samples across the sheet and at normal operating conditions.
Keep the removed knife identified and protected until its disposition is decided. The most useful replacement decision is one that leaves a clear record: what failed, what was ruled out, whether the knife can be reconditioned, and what should be checked before the same job returns to the press.
Related News
 How to Choose a Sheet Feeder for Paperboard ProductionChoose the right sheet feeder for paperboard with practical tips on material handling, line speed, integration, and trials to improve production reliability.Post-Press Kinematics Expert
 How Do Creasing Dies Prevent Cracks in Folded Cartons?Creasing Dies help prevent carton fold cracks through controlled deformation. Discover key tooling factors and practical production tips for cleaner, more consistent folds.Post-Press Kinematics Expert
 How to Prevent Sheet Misfeeds in an Automatic Feeder SystemPrevent automatic feeder system misfeeds with practical checks for sheet alignment, suction, air separation, timing, and double-sheet detection.Post-Press Kinematics Expert
 How Do Non Stop Feeder Piles Reduce Die-Cutter Downtime?Discover how non stop feeder piles reduce die-cutter downtime, improve pile-change efficiency, and keep sheet feeding reliable on long production runs.Post-Press Kinematics Expert
 USITC Advances Trade Probe Into Corrugated Die-Cut BoxesCorrugated die-cut boxes face a USITC trade probe. Explore what the investigations could mean for packaging costs and sourcing.Post-Press Kinematics Expert
 What to Consider When Choosing Heavy Duty Pile TurnersChoosing heavy duty pile turners? Discover how to assess load capacity, substrate handling, safety and operating costs to find the right fit for your production line.Post-Press Kinematics Expert